Ren'Py How To: parallax camera and "drunken" blur
I've been asked about how I accomplished the visual effects in Back When, more specifically the parallax and blur effects. Here's the answer!
Parallax
The parallax effect used the following transform:
transform parallax:
    perspective True
    subpixel True
    function moving_camera
Which I used when displaying the master layer (where the background and sprite are) by adding the following line to the before_main_menu and start labels:
camera at parallax
(Edited to replace "show layer master at parallax" with "camera at parallax", which as of the introduction of the camera statement with 7.4.6 is the best way to apply 3D stage effects you want to keep from scene to scene.)
Perspective True turns on Ren'Py's 3D Stage, which means I can specify how close to the "camera" the background and sprite are relative to each other. Subpixel True makes the master layer drawn with subpixel accuracy, so small nudges of the cursor don't make the images jump pixel by pixel. Then there's the last line, the moving_camera function, which is what actually, well, moves the camera.
def moving_camera(trans, st, at):
    if persistent.parallax:
        x, y = renpy.display.draw.get_mouse_pos()
        trans.xoffset = (x - config.screen_width / 2) * .05
        trans.yoffset = (y - config.screen_height / 2) * .05
    else:
        trans.xoffset = 0
        trans.yoffset = 0
    return 0
This function checks the position of the mouse, and changes the offset of the transformed displayable (in this case, the master layer) based on that. You'll notice it only does so if persistent.parallax is True, which I included so I could provide readers an option in the settings menu to turn off parallax.
The last ingredient was taking advantage of that 3D Stage feature to set the background at a different distance from the camera. I took a 1975x1111 background and displayed it at the transform:
transform bg:
    truecenter()
    zzoom true
    zpos -1000
Truecenter centers the background, zpos sets the image "further back", and since that shrinks the image zzoom true scales it back up. With that, I had a working parallax camera!
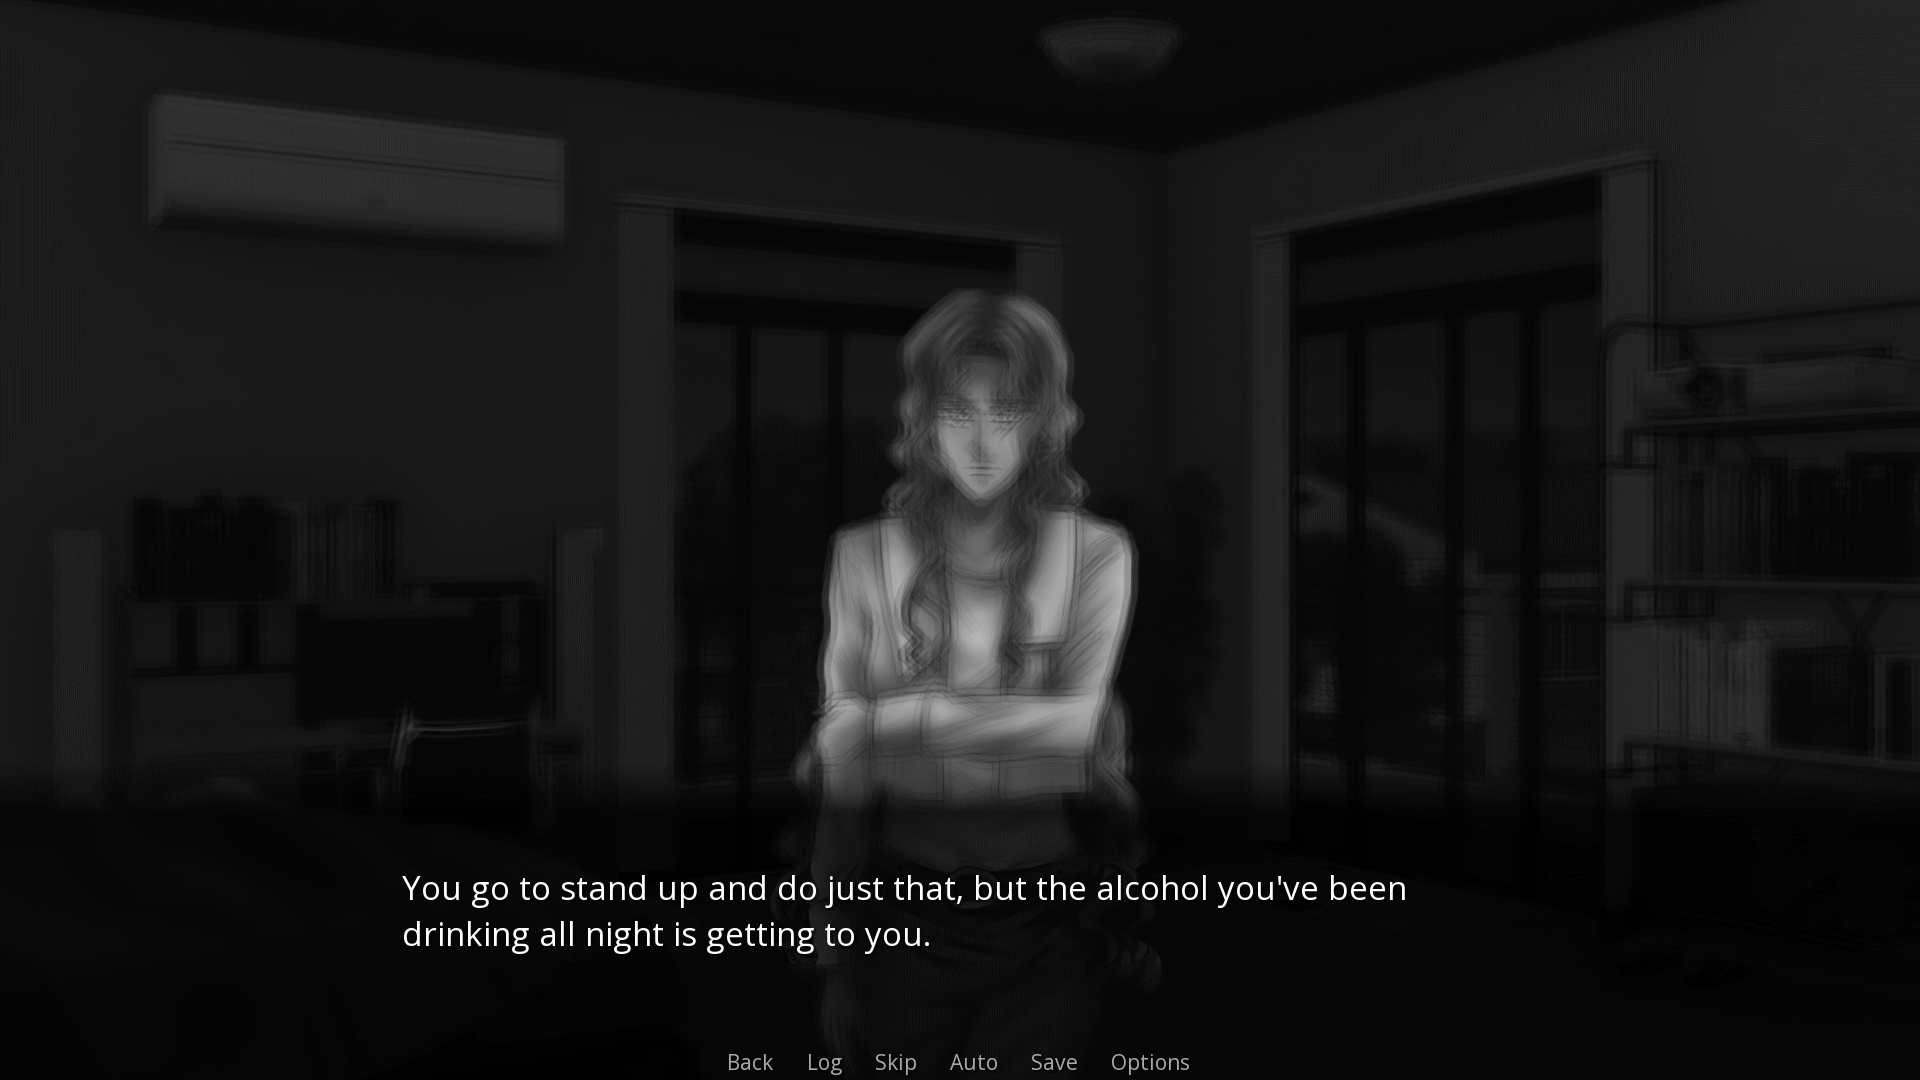
Blur
There were actually two blurs I used. One was the Ren'Py blur which can be used in transforms to give a kind of motion blur effect. I used this to blur Brooke's sprite when it first appeared, like so:
show brooke at default:
    linear .25 blur 5
    linear .25 blur 0
This is also the blur I used on the screens layer when the confirm screen was shown, so the rest of the game menu would appear out-of-focus. But if used to blur the master layer it didn't play well with the background's transform (specifically the negative zzoom seemed to be the issue...), and I wanted a somewhat different effect anyway, so I also wrote a custom shader:
renpy.register_shader('drunk', variables="""
    uniform sampler2D tex0;
    uniform vec2 u_model_size;
    varying vec2 v_uv;
    uniform float u_blur_radius;
    uniform float u_dark_radius;
""", vertex_300="""
    v_uv = a_position.xy / u_model_size;
""", fragment_300="""
    vec4 col = texture2D(tex0, v_uv);
    col += texture2D(tex0, v_uv + vec2(.0, -u_blur_radius) / u_model_size);
    col += texture2D(tex0, v_uv + vec2(.0, u_blur_radius) / u_model_size);
    col += texture2D(tex0, v_uv + vec2(-u_blur_radius, .0) / u_model_size);
    col += texture2D(tex0, v_uv + vec2(u_blur_radius, .0) / u_model_size);
    col /= 5.0;
    gl_FragColor = vec4(mix(col.rgb, vec3(0,0,0), max(distance(v_uv, vec2(.5,.5)) / sqrt(.5) - u_dark_radius, .0)), col.a);
""")
This shader isn't anything too crazy for those familiar with shaders to begin with. It takes the existing texture (tex0) and layers it over itself for a total of five layers, four of those slightly offset in different directions, and then divides by 5 to prevent everything from becoming super bright. This gives more of a double-vision kind of blur, which was perfect for what I had in mind. Then I mixed the result with black depending on the distance from the center of the screen, so it'd be black around the edges. To use this shader I wrote the following transform to show the master layer at:
transform drunk:
    parallel:
        parallax()
    parallel:
        shader 'drunk'
        u_blur_radius .0 u_dark_radius 1.0
        easein .5 u_blur_radius persistent.blur u_dark_radius .5
        .1
        easeout .5 u_blur_radius .0 u_dark_radius 1.0
The previous parallax transform is still being run, but now in parallel to that is the drunk shader. The blur radius goes from .0 to the persistent.blur variable (7.0 by default, .0 if the player turned off blur) and back, and the dark_radius goes from 1.0 to .5 and back (arguably I did a poor job naming this variable - values of 1.0 and greater mean no black around the edges, -1.0 would make for a completely black screen, which is not necessarily intuitive but ah well).
And that's how the sausage was made! Hope you all enjoy(ed) Back When and make some cool VNs!
Get Back When
Back When
A short visual novel about a visit from an old friend.
| Status | Released |
| Author | Midge |
| Genre | Visual Novel, Interactive Fiction |
| Tags | Black and White, Female Protagonist, First-Person, Ghosts, Kinetic Novel, Narrative, Ren'Py, Short, Story Rich |
| Languages | English |
| Accessibility | Blind friendly |
More posts
- Version 1.3: fix for safari/webkit browsersMay 16, 2023
- Version 1.2: minor bugfixesAug 03, 2021
- Version 1.1: now available to play in browser!Jul 25, 2021
Comments
Log in with itch.io to leave a comment.
Awesome! Thank you, this is a life saver.
awesome post, helped a ton. I’m gonna have to check out your vn when I’m done with mine :)))